Stand Strong Behind the Chair: Why Posture Matters for Barbers
Long hours on your feet, repeated cuts and awkward reaches add up fast — and that’s how lower back pain shows up. This short guide gives friendly, practical posture hacks you can use between clients to stay comfortable and productive. You won’t need fancy gear: just simple cues, stance tweaks, and tiny habit changes.
Inside you’ll find clear sections on knowing your lower back, finding a neutral spine, smart stance and weight distribution, workstation setup, tool handling to cut smarter, and quick breaks, stretches, footwear, and recovery routines. Try these workshop-friendly tips today and keep standing strong behind the chair. Simple, repeatable habits protect your spine and boost longevity daily.


Know Your Lower Back: Simple Anatomy and Common Pain Triggers
What’s in play — in plain terms
Your “lower back” is mainly the lumbar spine (5 vertebrae), the deep core muscles that stabilize it, your hip joints, and the hamstrings that attach to the pelvis. Think of the lumbar spine as the mast, the core as the guy-wires, and the hips/hamstrings as the floor anchors. When the anchors or guy-wires aren’t doing their job, the mast takes extra load.
Pain triggers you see every day
Barber work lights up a few predictable problems:
Picture this: you bend forward for a neck shave, twist right to check a line, then shift weight onto one leg while balancing clippers — that sequence is exactly how a small strain becomes a nagging ache.
Quick, practical how-tos you can use now
These simple checks keep the lumbar spine protected — next, we’ll turn these ideas into easy cues for finding your neutral spine between clients.
Find Your Neutral Spine: Easy Postural Cues to Use Between Clients
Quick posture cues — the simple map
Think of neutral spine as “stacked, not stiff.” Use these fast cues while you’re waiting for color to set or lather to sit:
Fast checks you can do in 10–20 seconds
Stand facing a mirror or use the wall test: back of head, shoulder blades, and butt lightly touch the wall; there should be a small gap at your lower back. If you feel a big hollow, ease the arch by tilting the pelvis back a touch.
Try a two-breath reset between clients: inhale to expand the ribs, exhale and draw the ribs gently toward the pelvis while nudging your pelvis under. That’s your neutral.
Subtle corrections while cutting
Small, quick actions that won’t disrupt a service:
Do’s and don’ts (practical)
A quick wall test or three breath resets between clients builds a habit — small, repeatable, and saves your back in the long run.
Stance and Weight Distribution: How to Stand for Less Strain
Feet: your base of operations
Think of your feet as the shop floor’s tripod — small adjustments change how much load the lumbar spine feels. Start with feet roughly hip-width apart for general work. Angle toes slightly outward (10–15°) for stability. For long, static tasks aim for a 50/50 weight split; when you need to be active, shift a little forward onto the balls of the feet so your ankles and hips do more work and your low back relaxes.
Staggered vs. parallel — when to use each
Move don’t twist
Instead of rotating your lumbar spine, take micro lateral steps toward the chair. Plant the leading foot as a pivot, rotate from the hips, then readjust your base. This small habit cuts twisting strain dramatically over a shift.
Quick drills to build endurance
Practical shoes (e.g., supportive trainers like New Balance or work clogs like Dansko) and these drills will make standing feel easier — next up, we’ll tune the chair, client, and tool heights so your stance works with your setup.
Workstation Setup: Optimize Chair, Client, and Tool Height
Set work height by body angles — not numbers
Forget exact inches. Adjust the chair so your elbows sit around 90–110° and your forearms are roughly parallel to the floor when you’re cutting or shaving. If your forearms droop or you’re reaching up, the lumbar compensates. Quick test: stand relaxed, pull your elbows to your sides — that is your “sweet zone” for most detailed work.
Position the client — angle, don’t bend
Instead of bending at the waist, rotate or recline the client. Tilt the chair back slightly for neck and face work; swivel the seat or ask the client to turn their head for side sections. For nape work, drop the headrest and lower the cape — then move your feet, not your spine. Small changes (a 10–15° swivel) save a surprising amount of low-back load over a shift.

Footrests, platforms, and small shop upgrades
Use a stable riser or anti-slip platform to raise shorter clients so you don’t stoop. A low barber step or sturdy 2–4″ wooden riser works wonders and fits under most chairs. Add a footrest for clients (it reduces fidgeting and keeps them steady). Portable anti-fatigue mats and a rolling saddle stool (for detailed work) are inexpensive, shop-friendly fixes with immediate ergonomic returns.
Mirrors, lighting, and the reach triangle
Angle mirrors so you can see without leaning forward. Use a flexible-arm task light to brighten cut lines instead of getting closer. Arrange tools in a “reach triangle”:
Place magnetic strips or a small caddy on the chair or trolley to keep scissors within that primary zone. A two-minute tweak between clients—raising the chair or swinging your light—often prevents an hour of back pain later.
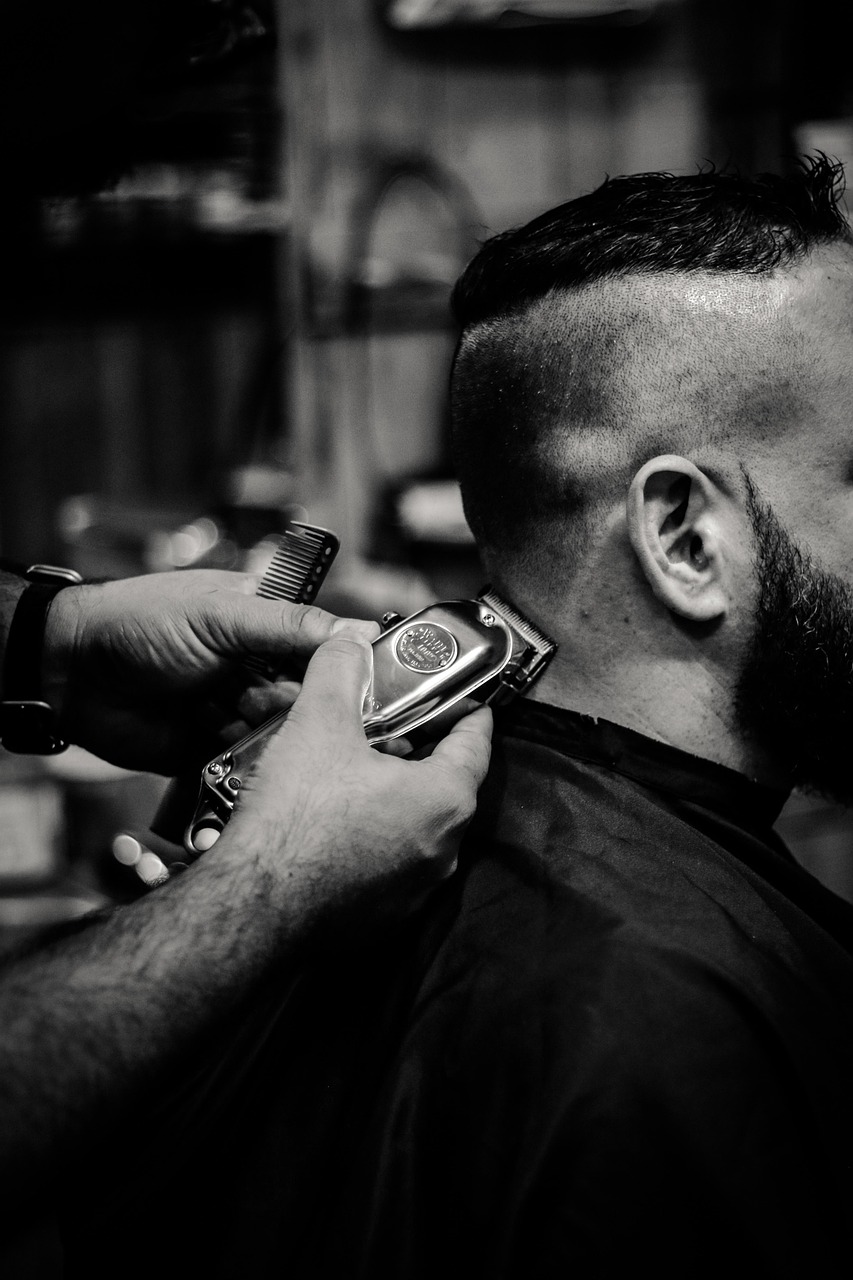
Tool Handling and Motion Economy: Cut Smart, Move Less
Lighten the load: choose and balance tools
Heavy tools force you to recruit shoulders and lean forward more often. Look for lighter clippers and ergonomic shears—balance matters as much as weight. A well-balanced trimmer feels neutral in your hand and slices with less wrist torque. Tip: try a tool in each hand for 30 seconds before buying; if you’re yawning to counteract tension, it’s probably too heavy.

Grip, support, and alternating hands
Avoid the “death grip.” Use a relaxed pinch where the thumb and ring finger share work, and rest your pinky on the finger rest or the client’s head for stability. Train your non-dominant hand for simple tasks—holding a comb, trimming edges—to distribute load. Barbers who alternate hands report less fatigue after long shifts.
Shorten reach: bring the client, not your spine
Instead of leaning in, tilt or raise the chair, slide the client closer, or use a low riser. Even a few inches saved in reach cut down repeated lumbar flexion across a day.
Batch motions and reduce transitions
Group similar actions: clip bulk first, then blend, then detail, then blow-dry. Batching reduces awkward tool swaps and the micro-adjustments that add up to back pain. For example: do all clippers work on one side, then the other, then follow with scissor-over-comb.
Micro-movements and cordless freedom
Use short wrist/forearm flicks instead of large shoulder swings—micro-movements are less fatiguing and more precise. Cordless tools remove tether-induced twists; consider models from trusted lines (look for balanced battery placement and low vibration).
Quick shop drills (5–10 minutes)
Next up: quick recovery habits—micro-stretches, footwear choices, and break routines that keep you cutting comfortably all week.
Breaks, Micro-Stretches, Footwear, and Recovery Routines
Quick breaks & 30–90s micro-stretches
Between clients, spend 30–90 seconds on one focused move—these stop stiffness before it starts.
These moves are small but powerful—one barber told me a single daily hinge drill erased the “tight morning back” she’d had for years.
Footwear & anti-fatigue mat guidance
Invest in supportive, slip-resistant shoes and rotate pairs. Look for firm arch support, roomy toe box, and a shock-absorbing sole.

Other strong options: Dansko clogs (roomy, durable) or Birkenstock Professional slip-ons (contoured footbed). Pair shoes with a 3/4″ anti-fatigue mat—dense foam or gel matting reduces lumbar load over a 6–10 hour shift. Replace mats after about 2–3 years or when compressed.
Nightly recovery routine (5–10 minutes)
Red flags — see a clinician
Seek urgent care for severe leg weakness, numbness in groin, loss of bowel/bladder control, fever with back pain, or rapidly worsening pain. For persistent pain >2 weeks despite self-care, schedule a physical therapy or primary care visit.
Small daily habits—30 seconds at a time—compound into weeks of pain-free standing. Next, we’ll wrap up practical takeaways to keep you cutting comfortably.
Keep Cutting, Keep Comfortable: Simple Habits That Add Up
Small, consistent changes beat one big overhaul. Pick two posture hacks from this guide, try them for a week, and note any reduction in pain or fatigue. Add a 60‑second micro‑check between clients and a brief pre/after shift stretch.
Track what helps, tweak as you go, and make adjustments part of your routine—consistency over perfection. With better stance, tool habits, and shop setup you’ll cut smarter, stand longer, and enjoy work more. Start today: try one change at your next client and build from there. Your back will thank you daily.


Has anyone tried combining the wobble board with micro-breaks? I imagine doing 1 minute balance work + 1 min stretch during foils could be perfect.
Also — tiny nitpick: the posture corrector pic looked a little extreme. Might scare new barbers into thinking they need full-time braces lol.
That combo is excellent — short balance sets plus micro-stretches between clients. And good note about imagery; posture tools should be framed as occasional aids, not crutches.
I do wobble + stretch during foils. Helps keep me awake and engaged, haha.
@Ethan same here — makes me feel like I’m training for something instead of just waiting.
Ok I’m one of those people who thought lower back pain = old age. Turns out: bad stance + wrong shoes.
Bought Skechers Flex Advantage and paired it with a ComfiLife mat — game changer. My feet don’t scream by noon anymore.
Also, micro-stretches between clients? Do them. Don’t be that barber hunched over for 8 hours.
PS: the guide’s humor made it readable. Thank you! 😂
Love this, Sara — footwear + mat is a simple combo with big returns. Skechers being slip-resistant helps for safety too.
Tip: wear socks when testing shoes with mats in store — makes it easier to judge comfort without clogging them with hair 😂
If you want a quick sequence, try: 30s heel-to-glute stretch, 30s standing hip flexor stretch, 30s knees-to-chest (seated). Repeat once.
@Jon haha true, I had to clean clippings out of my shoes once — never again.
Micro-stretches saved me during busy Saturdays. Even a 30-second glute/ham stretch helps.
Agree — Skechers are comfy but I’d recommend trying on in store; everyone’s foot shape differs.
Fun, practical guide. A couple of thoughts:
– If you buy an anti-fatigue mat (ComfiLife or FEATOL), get a broom nearby — hair sticks to them.
– The wobble board is weirdly addictive.
– I use Skechers and they pair great with a mat.
Thanks for concise, actionable advice!
Nice summary, Zoe — and excellent tip about keeping a broom or small vacuum near the mat. Prevents buildup and tripping hazards.
Totally — I sweep after every three clients. Also wipe the mat weekly to avoid hair buildup grime.
Minor gripe: wanted more photos of workstation setups in cramped shops. Most tips assume you have space. Still, the content is useful — I’ll try the staggered stance and better shoes next week.
Love the ‘workstation setup’ section. I reorganized my station this week: raised my client chair a notch and swapped to a rolling saddle stool for sit/stand transitions. Immediate relief in lower back.
A longer note because this actually changed my daily routine:
– Raised chair to keep my wrists neutral while cutting
– Got a YEEZEE saddle stool for quick sits during color processing
– Invested in ULG Japanese scissors — less hand strain
I know it’s not cheap, but the $ spent is an investment if it keeps you cutting longer without pain.
Fantastic — thanks for the detailed write-up, Priya. The YEEZEE saddle stool is great for alternating positions; the ULG scissors are praised for sharpness and lighter hand fatigue. Glad it’s working for you.
Do you find the saddle stool makes it tricky to reach clients at certain angles? Thinking of trying one but worried about mobility.
Good point @Nora — saddle stools are best when your station allows quick repositioning. If space is tight, consider a compact stool or practice sit/stand cadence first.
Agree about the scissors — switched to ULG 6.5 and my wrist flares up way less. Might be placebo but worth it.
@Nora — it took a week to adjust but now I can roll in/out and use footrest for stability. If your station is tight, test one first (some stores demo).
This guide is gold — finally something practical that doesn’t say “just stand up straight” 😅
I tried the neutral spine cues today between clients and it actually helped. The tip about shifting weight to the balls of your feet made a bigger difference than I expected.
Question: anyone tried the ComfiLife or FEATOL mats? Curious which one holds up better under heavy clippers and hair piles.
Also thinking of the Fit Geno posture corrector for long shifts — any real-world experience?
Good tip from Liam and Maya — and remember footwear matters too. Skechers slip-resistant shoes can reduce fatigue when used with mats.
I wore a Fit Geno for a week and it helped my shoulders relax, but it felt odd after long wear. Use it for a few hours max and pair with the micro-stretches.
Thanks Emma — glad it helped! ComfiLife is thinner (3/4 inch) and great for light-duty, FEATOL’s extra thick one gives more cushion if you’re on your feet all day. For posture correctors like Fit Geno: useful for reminders but don’t rely solely on them — combine with neutral spine cues and micro-stretches.
I use the FEATOL at home and it’s comfy, but hair and clippings stick to it a little — so I keep a broom/hand vac nearby. If you want something easy to clean, ComfiLife wipes better.
Real talk: I tried the Fit Geno posture corrector for a week. Helped hold my shoulders back, but kept popping it off mid-shift because of sweat and itchiness. Anyone else with sweaty-back solutions? Antiperspirant? 😂
Common issue — try wearing a thin moisture-wicking base layer under the corrector, or limit wear to short blocks (1–2 hours). Antiperspirant and breathable fabrics help.
Thanks! Will try the tank trick. The sweat was seriously the dealbreaker.
I use a lightweight athletic tank under mine and it’s WAY more comfortable. Also rotate use — not all day.
If irritation persists, consider posture cues and strengthening instead of prolonged brace use.
Real talk: I tried the posture corrector once and hated it. Felt like wearing a backpack strap around my shoulders. Maybe I’m doing it wrong. The stance tips were more useful for me than gadgets.
I appreciate the ‘tool handling and motion economy’ section. Little wrist pivots and consistent hand placement seriously cut down on repetitive strain.
Quick note: the ULG scissors are sharp, but keep ’em oiled. Dullness = more force = back/shoulder tension from overcompensating.
Seconding the oil tip. Also get a small wrist rest towel on busy days to change hand position every few clients.
Exactly — regular maintenance of tools reduces force needed and helps overall ergonomics. Oil, tighten pivot screws, and replace when necessary.
Loved the ‘stance and weight distribution’ diagrams — helped me stop leaning on one leg all day. I made a two-minute routine to reset posture after each cut.
Also curious: is the wobble board safe for older barbers with knee issues?
Glad the diagrams helped. For older barbers or anyone with knee problems, start standing balance work with hand support (chair/backrest) and low duration. Skip the wobble board if knees are painful; use static balance drills instead.
Short and sweet: the wobble board idea actually made me laugh but it’s brilliant. Small balance work while waiting for dye to set = multi-tasking win.
Haha, agreed — the Amazon Basics wobble board is low-cost and can build ankle/core stability. Start with short sets (30–60s) and avoid if you have unstable knees.