Trim with Confidence: Get a Sharper Beard in One Session
Practical and friendly, this primer shows how to line up your beard with clippers for a deliberate, balanced, barber-fresh look. Follow six clear steps to plan, cut, blend, and maintain your beard for sharp, confident results quickly in one session.
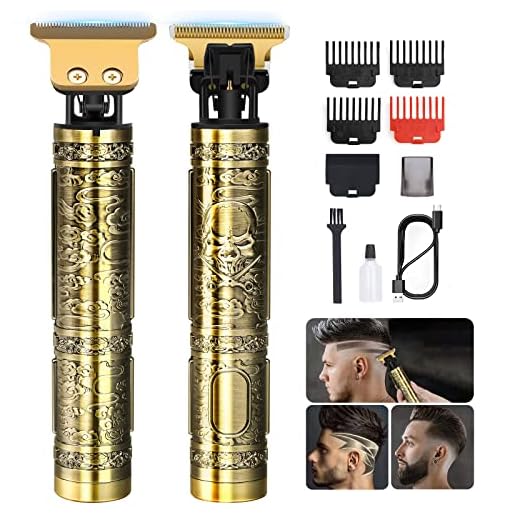
What You’ll Need

Perfect Your Beard: Simple Steps to a Precise Line Up
Prep Your Face and Tools
Think washing is optional? Think again — good prep makes every line cleaner and cuts down mistakes.Start by washing your beard with a mild cleanser, then towel-dry until dampness is gone. Comb through to remove tangles and position hairs the way they naturally fall. For example, run a wide-tooth comb from cheek to chin to spot cowlicks.
Inspect your clippers: clean hair from the blades, oil them lightly, and tighten any screws. If your clippers tug on hair, replace or sharpen the blades.
Set up bright, frontal lighting and a mirror at eye level—use a desk lamp or natural window light to avoid shadows. Organize guards by size within easy reach so you can swap quickly.
Charge your clippers fully before starting. Proper prep reduces tugging, uneven cuts, and post-shave irritation.

Map Your Beard Shape
Want symmetry that turns heads? Your natural bone structure already gives you the blueprint—learn to read it.Decide the overall shape — short boxed, full, or tapered — by reading your jawline and cheekbones. Visualize where lines should sit: place them slightly higher on a strong square jaw, lower and softer on a rounded face.
Pinch-test the neckline by pinching skin above your Adam’s apple; if you can pinch two fingers, use that as your baseline. Mark the line with a washable pencil or trace it with a fingertip so you don’t accidentally go too high.
Use reference photos to keep proportions consistent on both sides.

Establish the Neckline
Necklines make or break the look—set it low and natural, not razor-high and fake.Find the line two fingers above the Adam’s apple as your baseline. Follow a smooth curved line from behind each ear down to that point, aiming for mirror symmetry. Use clippers with no guard or a short guard and remove hair below the line with steady downward strokes. Keep wrist movements controlled and move slowly to avoid choppy cuts. Check symmetry frequently by stepping back or taking a photo.
Clean up stray hairs for a crisp transition into the shirt collar.

Define Cheek and Jaw Lines
Sharp cheek lines equal polished style; sloppy edges make a great beard look tired—don’t let them linger.Follow the jaw’s natural curve for a soft, natural cheek line. Create a straight or slightly angled line for a sharper, sculpted look—think a subtle 10–20° angle toward the ear for definition.
Work deliberately: start at the center of your face and move outward in short, controlled strokes. Check symmetry by stepping back or taking a quick photo. Use the comb to lift hairs and trim slowly so you don’t overdo one side.
Use the clippers without a guard or a detail trimmer for precision. Work slowly from the center out, stepping back to check both sides. Use your comb to lift hairs and scissors for any stubborn strands near the mouth.

Blend and Fade for a Pro Finish
A subtle fade hides imperfections and reads instantly pro—no barber needed for a clean gradient.Switch guards to blend the longer cheek and chin hair into the shorter neckline and sideburns. Start with a higher guard on top, then step down gradually to create a smooth gradient.
Start with a higher guard, then step down—#4 → #3 → #2—while moving the clippers in a scooping motion. Work in short, overlapping passes and check from different angles. For example, when fading from cheek to jaw, rock your wrist outward to soften the line.
Use clipper-over-comb for tailored fades: hold the comb at an angle, lift the hair, and run the clippers over the comb teeth to remove length precisely.
Finish with a detail trimmer to crisp edges and a light brush to spot inconsistencies.
Final Touches and Maintenance Routine
Want that fresh-cut look every day? A three-minute maintenance ritual beats a monthly panic session.Inspect your beard in different light and angles. Use natural daylight, an overhead mirror and a side mirror; lean forward to check the neckline and tilt your head to reveal uneven fades.
Snip stray hairs with sharp scissors using a point‑cut technique—clip 1–2 mm at a time to avoid surprises. Work slowly and check often.
Touch up any uneven spots with the detail trimmer using short, controlled strokes to refine edges and patch spots.
Apply beard oil or balm to condition and style. Rub 3–5 drops of oil between palms, work from roots to tips; use a pea‑size of balm to shape stubborn areas.
Clean your clippers: remove trapped hair, brush the blades, detach if possible, add a drop of oil along the teeth, run briefly, then wipe and store dry.
Establish a maintenance cadence:

Go Rock That Line
Consistent prep, measured lines, and subtle blends build a barber-quality beard. Practice these steps, try them today, and share your results so others can learn. You’ll save time, look sharper every day — now go post your look with pride!


Thanks for the simple checklist. I wish the tools list was longer — any recs for a travel trimmer? I’m always on the road and hate lugging my big clippers.
Long post incoming, sorry lol — but I tried the ‘Blend and Fade for a Pro Finish’ section and learned some stuff the hard way.
1) Started with too short a guard and freaked out. Beard looked chopped. 😬
2) Backed up, put a longer guard on, then did the slow upwards flick motion like the guide said. Much better.
3) The little circular motions near the jawline? Game changer.
One weird question: anyone else get random patchiness after trimming? Feels like I overdid the fade in one spot. How do you best hide that until it grows back?
If it’s really visible, I dust a tiny bit of matte brow powder near the patch (weird hack from my wife) and it helps blend until it grows.
I just accept the tiny imperfection and call it character 😂 but serious: slow short strokes and step back to check often. Don’t trust the mirror at 6 inches.
Patchiness = free personality lol. But fr, use a 0.5–1mm longer guard over the whole area to even it out, then gradually taper.
Agree with admin — tinted balm works wonders. Also, avoid shaving the area completely as a ‘fix’ — you’ll regret it.
Totally normal to see temporary patchiness after a heavy blend — takes a few days for hairs to settle. Quick fixes: slightly darken the shadow with a bit of tinted beard balm or use a longer guard to even it out. If the patch is shallow, letting it grow 3–5 days then re-blending usually fixes it.
I appreciated the step-by-step, but ngl the “Map Your Beard Shape” felt a bit too cautious for my impatient self. I like clean, sharp lines fast. That said, the ‘Blend and Fade’ saved me from looking like a cartoon barber did it 😆
Also — pro tip for lazy folks: mark one side, then fold a paper towel and use it as a visual symmetry guide. Works surprisingly well. Will try the maintenance routine weekly now, hopefully no more beard disasters. ✂️
Paper towel — genius. Gonna try that tonight.
If you’re going fast, just keep the guard on and do light passes. Less room for mistakes.
Cartoon barber era ended for me after learning to blend. Also, remember to clean/clog out the clippers after each session — saves headaches later.
Haha love the paper towel hack, Daniel. Mapping is for people who want symmetry without stress, but if you’re confident, a quicker approach works too. Weekly maintenance is a solid plan.
Short and sweet: section 1 and 6 are a must-read. Prep + maintenance = no panic trims at 2am.
Also, pro tip: keep the trimmer blades oiled. Makes the line cleaner and the motor happier. And don’t forget sunscreen on the neck after you shave/balance — sunburned patchy neckline is the worst.
Great tip, Grace — blade oiling is underrated. And yes, skin care after trimming is part of the final touches we should all do more often.
Sunscreen note is clutch. Never thought about that, but makes total sense!
Good guide but wish there were more pics of neckline angles. I kept second-guessing where the line should hit — Adam’s apple level? Confused 😅
Great point, Marcus. The usual rule is to imagine a curved line from behind each earlobe and meet it above the Adam’s apple — about one to two finger-widths above. We’ll add a diagram in the next update.
This guide was way more helpful than I expected — especially the “Map Your Beard Shape” bit. I always just winged it and ended up with one cheek higher than the other 😂
I tried the neckline tip last night: tilted my chin down, marked the line with a comb, then clippers with a guard to blend. Came out sharp enough for my Zoom meeting today. Small things that made a big difference:
– Prep the face (hot towel) really helps
– Start blunt, then refine
Thanks for the step-by-step — felt like a mini barber lesson at home!
Totally agree about the hot towel — makes the hairs cooper8ive lol. How long did you leave it on?
So glad it helped, Emma! Nice tip about starting blunt and refining — prevents overdoing it. If you want, share a before/after (no pressure) and we can give tips on blending the jawline.
Nice! For me the comb trick saved my life. Also, shoutout to using a smaller guard to feather the cheek line — looks more natural.