Dull or balky clippers are frustrating—snags, uneven cuts, and longer styling time. You don’t need a new tool to fix them.
This guide shows three fast, practical fixes using replacement blades, guards, and cleaning brushes. First, learn quick diagnosis to tell if it’s the blade, the guard, or something else. Next, get step‑by‑step tips for choosing and installing blades and guards so cuts stay crisp. Finally, discover simple cleaning and maintenance routines and what accessories to buy to build a smart toolkit that keeps clippers performing. Quick fixes, big time savings.
Fixing Your Clipper Blades: Quick, Pro Tips for a Great Barbershop Cut
1
Quick diagnosis: Is it the blade, the guard, or something else?
A short troubleshooting checklist
Run these fast checks (takes 3–5 minutes) to pinpoint what’s slowing your clippers:
Cut a small, clean, dry lock of hair (1 inch) across the same spot you normally trim. Notice smoothness, tugging, or skipped hairs.
Listen while running the clippers: a steady hum is normal; grinding, rattling, or loud clacks are not.
Look at the blade alignment from the side: the moving (top) blade should sit flush and slide slightly over the stationary (bottom) blade without big gaps.
Inspect the guards and attachment fit: shake the clipper gently—does the guard wobble or pop off?
Check for visible hair, gunk, or product buildup between teeth and around screws.
A quick real-world example: a stylist I know blamed dullness on the motor, but a test cut showed single-strand tugging caused by a clogged blade and a loose mounting screw. Five minutes of cleaning and a tightened screw restored the cut.
Best Seller
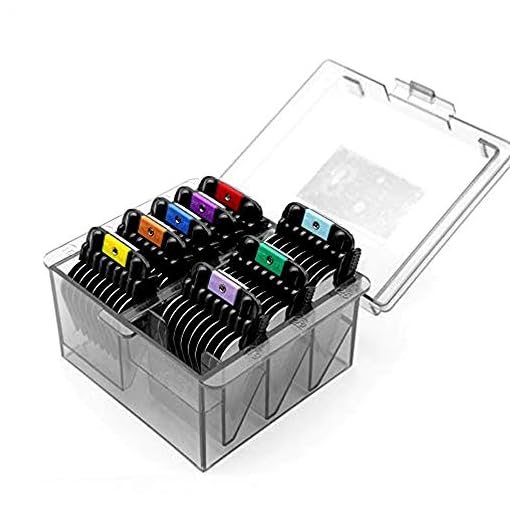
10-Piece Color-Coded Clipper Guard Set with Organizer
Fits most Wahl clippers; sizes 1/16"–1"
A set of 10 color-coded nylon clipper guards with a holder so you can quickly pick the right length and stay organized. Durable and flexible, they cover lengths from 1/16″ to 1″ for versatile home or pro cuts.
Worn blade teeth — uneven cuts and continual tugging; blades look rounded or nicked.
Loose screws or clipped housing — rattling or inconsistent blade movement.
Clogged blades/splash of product — sticky drag, especially after styling product use.
Improperly seated guard — uneven lengths or patchy results.
Low lubrication — blades heat up, feel gritty.
Motor or drive issues — weak power, inconsistent speed, deep grinding sounds.
Clear next steps based on your result
If blades bite or snag on clean hair and teeth look rounded → Replace the blade (common on Wahl Magic Clip, Andis Master, Oster Classic 76).
If buildup or product is visible and sound is slightly gritty → Deep clean and oil (see maintenance section).
If the guard wobbles, or you get patchy lengths → Reseat or replace the guard; color‑coded guards like the 10‑piece set help prevent mixups.
If screws are loose or parts rattle → Tighten screws, then re-test; replace missing screws if needed.
If the sound is harsh, motor weak, or problems persist after cleaning → Seek professional repair or contact manufacturer support.
Next up: how to choose and install replacement blades so that “replace and forget” becomes reality.
2
Replacement blades: choosing, installing, and maintaining for a crisp cut
Types and sizing made simple
Blades come in a few clear styles: stainless steel (durable, affordable), ceramic (stays cooler and longer between sharpenings), T‑blades (for edging and fading), and specialty pet blades (A5-style, cryogenically treated). You’ll also see detachable vs fixed blades — detachable blades click on for fast swaps (common on Wahl and Andis), while fixed blades require screw removal (classic Oster and professional models).
Common size shorthand (varies by brand): 0000/000 (.5–1mm), 0–1 (1–3mm), 2–4 (4–12mm). Always check manufacturer size charts — a “#2” on one brand may sit slightly differently on another.
Editor's Choice
8-Piece Stainless Steel A5 Comb Set for Pets
Snap-on sizes 10, 15, 30; color coded
Eight stainless steel guide combs that snap onto A5-style detachable blades to give consistent, smooth trims on dogs, cats, and horses. Color-coded sizes make selection easy and the included storage box keeps them tidy.
Match the blade series to your clipper model (e.g., Oster A5 blades for A5 drives; Andis A‑series for older Andis clippers).
Look for “fits” lists in product descriptions; manufacturer OEM blades are safest.
If swapping brands, compare mounting hole patterns and thickness — a cheap mismatch can misalign the drive.
Step-by-step installation (typical process)
Unplug the clipper and remove any guard.
Detach old blade: for detachable, press release and slide off; for fixed, remove the two top screws.
Clean mounting area: blow out hair, wipe with alcohol, remove debris from drive shaft.
Align new blade: set stationary bottom plate flush, then position top blade so the moving blade’s teeth slightly overlap the stationary teeth (about 0.5 mm).
Secure screws or snap into place; tighten screws until snug — don’t strip them.
Quick checks: run the clipper at idle — moving blade should slide smoothly with no visible gaps or chatter. Test on a towel or a small patch of hair.
Blade maintenance and care
Clean daily: brush out hair, wipe with blade spray or isopropyl alcohol.
Oil before every use and again after long sessions — a drop near the center teeth while running for a second spreads lubricant.
Deep clean weekly: remove blade, soak in blade wash (or isopropyl), dry completely, then oil.
Prevent rust: dry thoroughly, store blades in a dry case with silica packs; choose stainless or ceramic if you hate rust.
Minor sharpening: small nicks can be smoothed with a professional stone or send to a sharpening service; don’t attempt heavy grinding at home.
Replace when: teeth are rounded, repeated sharpening doesn’t restore cut quality, or pitting/rust eats the metal.
Safety and buying smart
Always unplug before handling blades, use a towel or gloves when removing sharp blades, and keep screws in a small container.
Source blades from barber supply stores, manufacturer sites, or reputable retailers (OEM or high‑quality aftermarket). Expect $15–$60 for most good replacement blades — don’t skimp on critical parts.
3
Guards and comb attachments: pick the right fit and stop uneven cuts
Why guards matter
Guards do two jobs: they give predictable length and they protect the blade (and scalp) from grabbing. The right guard turns a wild trim into a consistent fade — think of them as the clipper’s safety and measuring tape in one. A quick real-world test: a novice with a loose guard can create obvious striping in under 30 seconds; a snug, correctly sized guard gives a smooth, repeatable result.
Standard numbers and what they mean
Most guard systems use a simple numbering convention: higher numbers = longer hair left.
0 / 000 = very short (0.5–1mm)
1 = ~3mm
2 = ~6mm
3 = ~10mm
4 = ~13mm
(Exact lengths vary by brand and guard mold — a #2 on Wahl can differ slightly from a #2 on Andis.)
Always test on a small patch behind the ear first — this saves time and avoids surprise lines.
Professional Grade
6-Piece Extra-Long Wahl Clipper Guard Set
Extra-long sizes up to 2.5 inches
A heavy-duty 6-piece set of extra-long guards engineered to fit many Wahl full-size clippers and deliver stable, even cuts at longer lengths up to 2.5″. Reinforced edges and a secure clip-on design prevent slipping for a smooth finish.
Fine control without swapping guards — great for fades and blending.
Specialized guards
Texturizing/taper guards reduce bulk without changing overall length.
Wider or longer guards are made for thick, curly, or coarse hair to avoid bunching.
How to attach and check alignment (step-by-step)
Turn off/unplug clipper.
Match guard type to blade (snap-on lines up with blade teeth; screw-on aligns holes).
Slide or click the guard fully forward until you hear/feel the lock.
For screw-on, secure screws finger-tight; don’t overtighten.
Give a gentle tug and run the clipper briefly to confirm no wobble.
Visually inspect: guard should meet the blade with no visible gaps; teeth should be parallel.
Quick troubleshooting & fixes
Guard slips mid-cut: clean attachment slot, then re-seat; if worn, replace guard.
Loose clips: bend the metal clip slightly inward (small pliers) or add a strip of thin rubber for grip.
Marks or lines in hair: guard gap is likely — re-align, tighten screws, or switch to a screw-on guard.
Bunching with thick/curly hair: use longer or wide-tooth guards, or do multiple passes reducing length gradually.
Keep a small kit: spare snap-on guards, a screwdriver for screws, and a rubberized grip strip — these three items solve most guard headaches on the spot.
4
Cleaning brushes and simple maintenance routines that revive performance
The right brushes for the job
A small toolbox of brushes beats a single brush. Use:
Soft-bristle brush — gentle on blade finishes and plastics.
Stiff brush — scrubs vents and hardened gunk from blade teeth.
Small picks or interdental brushes — reach between teeth and into hinge gaps.
Must-Have
2-Pack Clipper Cleaning Brushes with Handle
Small, travel-friendly brushes for clipper maintenance
Two compact cleaning brushes with sturdy bristles and non-slip handles for removing hair and debris from clippers, trimmers, and nail tools. Lightweight and portable, they’re handy for both salon use and travel.
Tip: an old toothbrush, a dental pick, or interdental brush set (TePe-style) work great for stubborn residue. I once revived a 7‑year‑old Wahl by simply brushing and oiling for 10 minutes — it sounded like new.
Step-by-step daily cleaning
Turn off and unplug the clipper.
Remove guards and shake off loose hair into a bin.
Use the soft brush to sweep hair from the blade teeth, then the stiff brush for vents and housing seams.
If blades are detachable, remove them and brush under the blade plate.
For stubborn debris, use short bursts of compressed air from a distance — never force air into bearings.
Wipe blades with a lint-free cloth.
Cleaning agents and drying
Detachable blades: wipe with isopropyl alcohol (70–90%) to disinfect; let air-dry fully.
Guards/combs: wash in warm, soapy water; rinse and fully dry before reattaching.
Always ensure parts are totally dry before reassembly to prevent rust and electrical issues.
Lubrication: where, how often, and how to test
Apply 2–3 drops of clipper oil (Wahl or Andis oil) across the top of the blade teeth and run the clipper for 10–15 seconds to distribute.
Frequency: after every cleaning or every 30–60 minutes of continuous use for pro tasks; for home use, oil after every 3–4 cuts.
Test: blades should run smoothly without chattering; feel for even vibration and minimal heat after a 2–3 minute run.
Simple maintenance checklists
Weekly:
Brush blades and vents, oil blades, wash guards, check screws.
Monthly:
Remove blades for deep clean and alcohol wipe, inspect for nicks, replace worn guards, check power cord and motor brushes (if user-serviceable).
Quick troubleshooting
Overheating: clean and oil blades, let cool 10 minutes, check airflow vents.
Weak/strange motor noise: clogging in housing — open per manual, clear hair; if persistent, see a tech.
Sticky blades/product buildup: soak detachable blades briefly in blade wash or wipe with alcohol, scrub with stiff brush, then oil.
A little five-minute upkeep after each use keeps clippers cutting cleanly and prevents larger repairs down the road — next up, choosing the right accessories to streamline these tasks.
5
Buying smart: what to look for in accessories and building a toolkit
You’ve diagnosed, cleaned, and swapped parts — now make sure you have a compact, reliable kit that solves most dull-clipper problems on the spot. Build it once, store it well, and you’ll save hours (and clients) later.
Essential kit items
Keep these basics in one small pouch or case:
A matched replacement blade set: one detachable blade that fits your model plus a spare standard blade for quick swaps.
A set of quality guards in common sizes (1–6 or the sizes you use most).
Two cleaning brushes: a fine brush for teeth and a coarse/stiff brush for vents.
Blade oil (Wahl or Andis-style) and a small bottle for touch-ups.
A small screwdriver set (precision Phillips and flathead; include a Torx if your clipper uses it).
A blade alignment tool or simple alignment guide (helps prevent nicked scalps).
A soft zippered storage case to keep everything together and protected.
Best Value
10-Piece Black Clipper Guard Set for Wahl
Durable nylon guards, 1/16"–1" lengths
Ten robust black nylon guards designed to fit many Wahl-style clippers, offering cutting lengths from 1/16″ to 1″ for precise trims. Built to be flexible and long-lasting, they’re a practical replacement or upgrade set.
Tip: I once kept a spare detachable blade and a labeled guard pack in a barber bag — when a clipper heated up mid‑cut, a 60‑second blade swap saved the appointment.
Budget vs. pro gear: how to evaluate quality
Look for:
Material: stainless or chrome-plated steel for blades; durable ABS or nylon for guards.
Fit: manufacturer-specific fit is often worth it—generic parts can wobble.
Brand compatibility: Wahl, Andis, and Oster parts are usually cross-referenced; check model numbers.
Reviews: prioritise vendor photos and real-world usage notes (heavy use vs. home use).
Budget picks are fine for casual home use; pros should invest in OEM blades and hardened steel guards that resist warping.
Where to buy and smart buys
Authorized dealers or brand sites for OEM parts.
Reputable vendors (Amazon sellers with many verified reviews, Sally Beauty, Cosmoprof).
Local barber supply stores — you can test fit and get immediate replacements.
Buy blade sets or multi-guard packs for savings. Replace guards in matched sets to avoid uneven cuts from mixed wear.
Inventory & storage tips
Keep spare blades dry and lightly oiled in zip bags.
Nest guards by size and label the slots (masking tape works).
Replace small parts after visible wear; log purchases in a simple checklist or app.
For busy pros, higher-end blades, a sturdy hard case, and a professional alignment tool pay off with fewer interruptions and longer life — next, we’ll pull this all together in a quick wrap-up.
Fast fixes, less hassle: keep clippers cutting smoothly
Most dull-clipper problems are quick wins: swap in the right replacement blade, fit the correct guard, and use a brush and oil to restore crisp cutting. Follow the troubleshooting checklist, keep a basic accessory kit, and perform brief cleaning and lubrication after each few uses to prevent buildup and wear.
Try these quick fixes before replacing the whole unit, most hair‑cutting frustrations are fixable at home. Save time with a compact toolkit and simple routines. If performance issues stem from the motor or electronics, consult a professional for repairs or replacement today.
Daniel
Daniel Foster, a veteran barber with over 8 years of experience, is passionate about sharing his expertise through insightful articles and reviews.
45 Comments
Anyone tried mixing the 10-Piece Color-Coded Clipper Guard Set with the 10-Piece Black Clipper Guard Set for Wahl? I’m tempted to get both — color coding looks useful but the black set is cheaper.
Curious about durability between the two.
Mixing is fine as long as they fit your clipper. Color-coded sets help find sizes fast; black ones are fine if you prefer simple kits. Durability mostly comes down to plastic thickness and how you store them.
I mixed them — color pieces get used more, so they show wear first. The black guards held up slightly better in my experience.
Appreciate the “Buying smart” section — buying accessories can feel like an episode of hoarders if you don’t have a plan 😅
I added the 10-Piece Black Clipper Guard Set for Wahl to my toolkit and it’s been solid for touch-ups. Pro tip: label the organizer pieces with masking tape if you mix brands.
Labeling saved me too. Also keep a tiny notebook with blade/guard combos that work for each client/pet — total time saver.
Great tip on labeling — mixing brands is a common source of confusion. Masking tape or small colored dots work well.
Loved the practical checklist at the end. Fast fixes actually saved my weekend grooming session.
Small rant: some Amazon listings for “replacement blades” are vague — no model listed. Buyers beware. The 3-Pack Replacement Pet Clipper Blades Set I bought fit fine, but I almost returned them.
Pro tip: take a photo of your current blade and attach it when contacting sellers — speeds things up.
Agreed. Seller replies in the Q&A were decisive for me when buying replacement blades.
Thanks Zoe — I’ll flag the ambiguous listings. Always look for model numbers in the product Q&A or ask the seller. Reviews often mention clipper models people used them with.
If in doubt, choose returnable options. Many Amazon sellers accept returns within 30 days.
Ok, real talk — I tried the 6-Piece Extra-Long Wahl Clipper Guard Set for a big dog and thought I was set. But I still got some uneven lines.
The article’s guard-fitting tips helped — turns out I was forcing a guard that didn’t click in fully. Fixed that and the result was way better. Also: guards are cheaper than an emergency bath, lol.
Also consider going one guard size larger and then taper. Less chance of mistakes with big dogs.
Exactly — an improperly seated guard is a common cause of uneven cuts. Glad re-seating fixed it! Extra-long guards can flex more, so press firmly until you hear/feel the click.
Preach. I always run my hand along the guard before clipping to feel for rough spots.
I also learned to check for tiny burrs on the guard edges — they can catch hair and make lines.
Nice line: ‘cheaper than an emergency bath’ 😂
Long one coming — forgive the ramble 😅
I’ve been cutting dog coats for 5 years and the single biggest lesson is: routine > miracle product. You can buy all the 3-Pack Replacement Pet Clipper Blades Set and fancy guards, but if you don’t clean and oil blades after every session you’ll be back to square one.
The article’s section on simple maintenance nailed it. One addition I’d make: keep a spare blade and a spare set of guards in a small pouch ready to go for emergency touch-ups. Saved me at a show once.
Also, washers and small screws can vanish into the void (a.k.a. under the grooming table). Magnetic trays are your friend.
Five years of experience speaks volumes. Thanks for sharing the show story — feels relatable.
Excellent advice — routine maintenance beats one-off fixes every time. We’ll add the spare-pouch and magnetic-tray tips to the buying toolkit section. Thanks!
Magnetic tray = life saver. Also label the pouch with a note about blade sizes — helped a new tech avoid a huge mistake.
A tiny nitpick: the article could show pictures of how guards click in (I learn visually). Still, I appreciated the maintenance routine and the suggestion to build a toolkit with essentials like the 2-Pack Clipper Cleaning Brushes with Handle and a decent organizer.
Yes please — even a short gif would be enough for me.
Also, a diagram of comb sizes vs mm lengths would be amazing. Helps when you’re choosing sets like the 8-Piece Stainless Steel A5 Comb Set for Pets.
Agreed. I had to watch a YouTube clip to see the guard click — pictures in the article would make it complete.
Good suggestion — visuals would help a lot. We’ll add step-by-step photos or short clips for seating guards and blade replacement in an update.
Great piece — super practical. I never realized a dull blade could feel like a personality flaw for my clippers 😂.
I picked up the 3-Pack Replacement Pet Clipper Blades Set after the “Replacement blades” section and it honestly brought my old clipper back to life. Quick tip: soak blades in clipper oil for a few minutes before first use to help bed them in.
Question: anyone else use the 10-Piece Color-Coded Clipper Guard Set with Organizer? Does the organizer actually stay put or is it a gimmick?
Not a gimmick here — changed my workflow. Also the article’s quick diagnosis section helped me realize I was switching guards incorrectly. Saved me from uneven cuts.
I have the color-coded set and the organizer is fine for my shelf. It wobbles a bit but does keep the guards from getting lost. Worth it for the price.
Thanks Emily — glad the blade set worked for you! The color-coded organizer is handy; I found it keeps small workshops tidier, but it depends on how rough the storage area is. If you toss tools into a bin it won’t help much, but on a shelf it makes guard selection fast.
Neutral take: The article covers the basics well, but I wanted more troubleshooting for overheating clippers. The “Cleaning brushes and simple maintenance routines” section helped a bit, but what if it still runs hot after cleaning and new blades?
If clipper is cheap, replacement often makes more sense than repair. Depends on sentimental value 😅
Good question. If overheating persists after cleaning/brushing and installing a fresh blade, check motor brushes (if serviceable), bearings, and air vents. Sometimes it’s a failing motor or low internal lubrication — professional servicing might be needed.
I had that issue — turned out to be a cracked fan housing. Took it to a small appliance repair shop and they fixed it for less than a new clipper.
Short and sweet: cleaning brushes are underrated. Bought the 2-Pack Clipper Cleaning Brushes with Handle after reading the cleaning section — two brushes, two speeds of stubborn hair removal. Honestly, shame on me for not cleaning more often 😅
Totally — a little regular brushing prevents heat build-up and uneven cuts. Glad the brushes helped! Pro tip: use canned air for the hard-to-reach spots after brushing.
Haha same here. I used to just blow into the clipper (gross) until I bought the brushes. Game changer.
This article was helpful but I wanted more on blade compatibility. I have an older Wahl model and the replacement blade options online are overwhelming.
Also, the 8-Piece Stainless Steel A5 Comb Set for Pets — is that A5 size universal? The “choosing, installing, and maintaining” section helped but I’d love a compatibility chart.
Thanks!
If they don’t list model compatibility, a good rule is to compare the comb’s anchor spacing with your clipper’s. Took me a while to learn that one.
I had the same worry. I emailed a seller before buying A5 combs and they confirmed fit for my clipper. Worth that extra minute imo.
Not universal — check the teeth width. If the kit offers return shipping it’s low risk to try.
Good point, Sarah. Compatibility does vary — A5 combs generally fit many standard clipper teeth profiles but not all. If you tell me the Wahl model number I can try to check compatibility. We’ll consider adding a compact chart to the article.
Minor fume: the article is practical but could be shorter in places. Still, I followed the “Fast fixes, less hassle” checklist and replaced my blades with the 3-Pack set — fixed the drag I had been putting up with for months. Worth the buy.
Also: tiny typo in the second paragraph — ‘its’ vs ‘it’s’.
Good catch on the typo. Still prefer actionable depth over brevity, but a concise checklist at the top would satisfy both camps.
Appreciate the edit callout — we’ll correct that typo. Glad the 3-Pack helped. Thanks for the feedback on length, we’ll trim a bit in the next revision.