Quick Start: Why This No-Fail Clipper Haircut Works
Ready to cut your hair at home without panic? This simple, no-fail clipper haircut is built for COMPLETE BEGINNERS. It covers tools and setup, hair types and prep, clipper basics, an easy step-by-step tapered method, blending, finishing details, and common troubleshooting.
Expect a calm, repeatable process that takes about 30–60 minutes. Be patient and practice—results improve fast. No drama, just steady steps and confidence. Follow each section in order and you’ll get a clean, professional-looking cut you can replicate at home.


Mastering Men’s Haircuts: Clipper Techniques for Beginners
Essential Tools and Setup: What You Need Before You Begin
The exact toolkit (shopping-and-prep checklist)
Here’s everything that gives you a clean, predictable result—no mystery tools.
Affordable options and quick comparisons
Budget pick: Remington HC4250 or similar—simple and reliable. Best value: Wahl Color Pro (above) — color-coded guards make guard selection idiot-proof. Professional upgrade: Andis Master for heavier use and sharper blades. For beginners, cordless models avoid tangles; corded models give uninterrupted power.
Charging, oiling, and basic clipper care
Charge according to the manual—usually 1–2 hours for a full charge; most have an LED indicator. Oil blades before the first use and after every 30–60 minutes of cutting: place a drop on the blade teeth, run the clipper briefly to distribute oil, then wipe off excess. Clean hair from the blades with the brush after each pass.
Arrange a comfortable cutting space
Choose a well-lit bathroom or near a window; position a second mirror or prop your phone on a tripod to watch the back. Use a chair at waist height so your arms don’t tire.
Quick safety reminders
Unplug clippers before cleaning or oiling, keep blades capped when not in use, and store tools out of reach of children.
Know Your Hair: Types, Length Goals, and Prep
Assess texture and growth patterns
Start by feeling the hair. Fine hair lays close and shows the scalp quickly; medium hair holds basic shape; coarse hair needs more weight and may resist smooth fades. Check for cowlicks (common at the crown or hairline) and a natural part — these determine how short you can go without constant styling. Quick example: a stubborn crown cowlick means keep the top a bit longer so it blends.
Choosing realistic length and guards
Match your goal to your hair type and daily routine:
Prep: washing, drying, and detangling
Wash to remove product buildup — clean hair cuts more predictably. Towel-dry until slightly damp for scissor work; for clipper-only cuts, dry hair gives the most accurate length and prevents blades from clogging. Comb through to remove tangles; use a wide-tooth comb for thicker hair.
Dry vs. slightly damp — pros and cons
Pre-cut checklist
With hair assessed and tools ready, you’ll be set to move into clipper mechanics — guards, blade direction, and handling next.
Clipper Basics: Guards, Blade Direction, and Handling
What guard numbers mean
Guards are simple rulers for hair. Common sizes:
These cover most beginner needs; higher numbers add more length incrementally. Knowing the numbers helps you plan transitions instead of guessing.
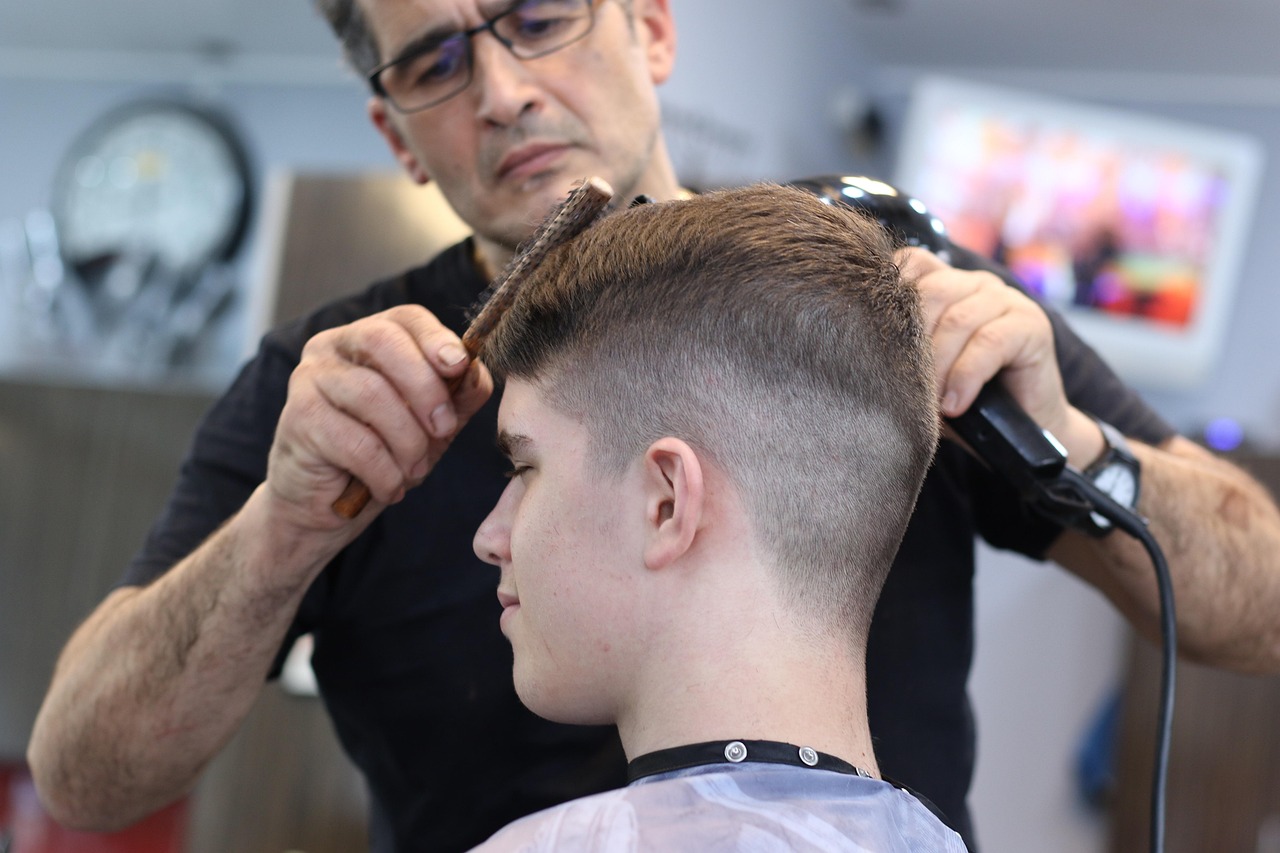
How to hold and place the blade
Grip the clipper like a firm handshake — thumb on the side or lever, fingers wrapped for control. Keep the blade plate nearly flat to the scalp for an even cut; tip the blade slightly (10–20°) only when feathering or softening edges. If the clipper “skates,” slow your hand and hold the blade flat.
Cutting motion and grain
For fades, start with slow single passes where precision matters (around the hairline and near ears). Use quicker, overlapping strokes on larger areas for speed and evenness.
Changing guards and maintenance between passes
Turn clippers off (or at least stop the motor) before swapping guards; align the notch and snap firmly. Between passes, brush loose hair from the blade, flick out trapped clippings, and oil 1–2 drops on the blade then run for a few seconds to distribute. Clean blades every few minutes on long sessions to keep cutting smooth.
Next up: simple blending tricks that make these basics look professional.
Step-by-Step Beginner Haircut: A Simple Tapered All-Purpose Method
This sequence is built for a fuss-free, flattering tapered cut that suits most men and older boys. Work calmly, one zone at a time, and use the checkpoints to self-audit as you go.
Setup & guard selection
Pick 3–4 guards before you start:
Turn clippers on, test them on a hidden patch, and keep a hand mirror handy to check the back. A reliable set like the Jack & Rose Cordless Professional Clippers Trimmer Set makes guard changes and cordless movement easier during longer cuts.

Sides and back — low-and-slow taper technique
Checkpoint: step back, look for even length and a consistent taper line from nape to temple.
Establish a midline and crown/top
Blending the transition
Checkpoint: run fingers through hair; the change should feel gradual, not clipped into a ridge. Use the hand mirror to check symmetry.
Finish neckline and ears
Final quick checks: step back, tilt the head, check both sides, and comb/style to see natural fall. When everything reads even and feels smooth, you’re done here — next, we’ll dive into blending and softening lines to make this cut look pro-level.
Blending and Softening Lines: Easy Techniques That Look Professional
Lift-and-flip short passes
When you see a harsh line, use short “lift-and-flip” passes: hold the clipper at a shallow angle, push up into the line, then flip the blade outward in a quick, short motion. Think of it as feathering—tiny, controlled strokes instead of long sweeps. A handful of passes (5–8) usually dissolves the ridge without taking off too much.
Use an intermediate guard + flick-out strokes
If the jump between guards is obvious, swap to the next-in-between guard or close the lever a half-step. Use short flick-out strokes at the transition—start against the grain and finish with a light flick away from the head. Smaller guard jumps mean safer, smoother gradients (Wahl Magic Clip and Andis Master let you fine-tune with their levers).
Clipper-over-comb basics
For more control, use clipper-over-comb: lift hair with a flat comb, place the clipper teeth against the comb, and skim across. Work slowly, make small adjustments, and repeat until the line softens. Expect 3–6 passes per zone.
Temples and crown tips
When to reach for scissors
Grab scissors when hair changes direction sharply, or when the clipper creates an uneven spot you can’t fix without removing more length. Scissors-over-comb gives a cleaner, controlled finish.
Practice these moves slowly and check symmetry often. Next up: precision detail work around edges, the neckline, and ears.
Detail Work: Edges, Neckline, Ears, and Final Shape
Neckline — natural vs tapered, and how to clean it up
Decide first: a natural neckline follows the hair’s growth (softer, casual) while a tapered neckline scoops higher and blends into the clipper work (cleaner, more intentional). For either: mark the center point at the base of the skull, work symmetrically from that point, and use short upward strokes. For a tapered look, close the clipper lever or switch to a lower guard and make small, even passes; for a natural finish, use a trimmer to remove stray hairs only and keep the hairline soft.

Around the ears — angle control and tiny movements
Tilt the ear with one finger and use the clipper’s edge to follow the contour. Use short, controlled strokes and a detail trimmer for the inner fold and behind the ear. If hair sits inside the ear canal, use small scissors with the ear gently pulled outward — never force clippers into tight folds.
Sideburns & edges — symmetry without overcutting
Choose square or tapered sideburns. Outline with a trimmer, then step back and compare both sides. Use a comb as a straightedge or sightline (hold it vertically from nose to ear) to match length and angle. Soften the line with a quick clipper-over-comb pass.
Top cleanup & final pass
Snip stray long hairs on top with scissors-over-comb. Finish with one light, full-head pass using the guard you want as the final length—this evens everything without removing more than intended.
Quick tidy routine:
Troubleshooting Common Mistakes and Quick Fixes
Uneven patches — how to fix a spot that’s shorter
If you find a short patch, don’t carve around it—blend into it. Use the next longer guard (example: if the patch is with a #2, switch to #3), start a few inches away, and work toward the patch with short, overlapping passes. Finish with clipper-over-comb or a pair of thinning shears (e.g., Equinox Thinning Scissors) to break up the transition.
Gullies or visible clipper lines
Deep lines happen when you change guards too abruptly. Soften them by:
Over-shortening the top — recovery options
If the top is shorter than intended:
Missed patches, symmetry problems, or major gouges
Stop cutting. Take photos from multiple angles, compare sides, then patch-blend small areas with higher guards. For large asymmetry or deep gouges, don’t try drastic DIY surgery—call a barber.
When to call a professional
Pause, reassess, and patch-blend rather than panic — then move on to the final recap and encouragement.
Ready to Practice: Quick Recap and Encouragement
Start with proper tools, go slowly, use guards and blending.
Practice often, keep photos to track progress, make small tweaks each time. Confidence and steady hands grow through repetition. Be patient, enjoy learning.


This guide spared me from butchering my roommate’s hair (mostly kidding, but really saved me). The part about blade direction = lifesaver. Had no idea that mattered so much 😂
Also, anyone else who tried the Philips Norelco MG3740 found the little attachments kinda fiddly? Felt like using a Swiss army knife on a bad angle.
Glad it helped, Derek — blade direction makes a huge diff. The Philips MG3740 is versatile but yes, those smaller attachments can be tricky for precise fades. For cleaner edges, a dedicated trimmer like the Jack & Rose set usually performs better.
Haha yeah, the MG3740 is great for full-body grooming but for a proper tapered fade I rely on a clipper with solid guards. The Color Pro is an easy starter.
I appreciate how the article breaks down guard numbers and blade direction. I’m totally new to clippers and was nervous about doing a tapered cut on my partner.
Couple of questions: 1) For very fine hair, do you still recommend starting with a longer guard and working down? 2) The article lists the 15-Piece Scissors kit — do beginners really need that or is it optional if you have good clippers?
Thanks — the troubleshooting tips were especially helpful (saved me from a weird choppy patch!).
Oh and FYI — for fine hair, brushing damp (not wet) hair forward while cutting can make it easier to see the natural fall and avoid cutting too short.
Also, Olivia — if you try and see choppy spots, check blade alignment and try a light guard over the area to blend. The Philips Norelco multi groomer in the product list can be a good budget backup for detail trims.
I started with only clippers and later bought the shears. Totally agree: scissors helped with blending the crown and adding texture, but not strictly necessary for a basic taper.
Hi Olivia — great questions. For fine hair, yes: start longer and take off less at a time; fine hair shows mistakes more easily. The scissors kit is handy for point-cutting and detail work, but if you’re just doing basic clippers-only cuts you can skip it at first. The shears shine when softening the top and doing texturizing.
Tried this yesterday on my boyfriend and honestly — game changer. The step-by-step taper was so clear I didn’t nick his ear once. Used the Wahl Color Pro Cordless and the 10-Pack Color-Coded guards from the list and the color coding made switching so fast.
One tip I learned: go slower on the sides and hold the clipper at a slight angle when blending. Made the fade look way cleaner. Will try the Jack & Rose trimmer next for the neckline.
Good point, Maya. The Lithium-Ion models do give a bit more torque for dense hair. Evan, if you ever run into popping lines while blending, try the clipper-over-comb motion from the ‘Blending and Softening Lines’ section.
So glad it worked for you, Evan! The Color Pro is a great beginner tool — that color-coded guard set really speeds things up. If you post a before/after, I’ll share a few mini-tips for edge cleanup.
Nice! I have the Wahl Lithium-Ion Pro and it’s way more powerful — held up better on thick hair when I tried the same taper. Might be worth upgrading if you plan to cut often.
Short and sweet: followed the ‘Quick Start’ and it actually works. My tip — clean your blades mid-cut if hair builds up, saves a patchy mess. Also, buy the 10-pack guards, don’t cheap out 🙃
Yep, oiling blades is underrated. I learned the hard way after the clipper started tugging. The Wahl sets oil nicely and run smoother after maintenance.
Totally — debris on blades = uneven cutting. A quick brush and oil makes a big difference. Thanks for the nudge about guards too!
Long post because I tried to be thorough — hope that helps someone else.
I did three practice cuts over the weekend. First one: too aggressive with the 2 guard on the sides and ended up with a high line. Second: tried to blend with scissors and made it worse. Third: followed the article exactly, used the 10-pack color-coded guards, and it finally looked professional enough to post a pic to my group chat. 😂
Big takeaways:
– Use the smaller guards for the neckline early and then step up for the sides.
– Blending with the clipper-over-comb method is way safer than freehand scissors for beginners.
– Invest in one decent trimmer for edges (I used the Jack & Rose for the final cleanup).
Question: any advice for cowlicks at the crown? Mine tend to stick up no matter how I blend.
Thanks everyone! Will try cutting it a bit longer and using the shears to thin — and maybe I’ll swap the clippers for the Lithium-Ion next round.
Also consider the Wahl Lithium-Ion Pro if you’re doing thicker crown areas — more power can help you get a cleaner cut without tugging.
Awesome testing process, Nina — that’s exactly the mindset that speeds learning. For cowlicks: cut slightly longer in that area and use texturizing shears to reduce bulk. Finish with a bit of product (matte paste) and blow-dry in the direction you want the hair to sit. If it’s stubborn, avoid making that spot too short.
I have a massive cowlick too. What helped me was cutting the crown last and blending into the cut rather than forcing it. Also, try angling the clipper a touch to follow the cowlick’s direction — makes it lay better.
If you ever want, send a photo (front/back) and I can point to specific guard numbers and angles to try. Not a pro stylist, but can give practical pointers based on your hair pattern.